Posts

Showing posts with the label Baltic

Archaeology versus History

Image
I was alerted to a blog post a few weeks ago with the (deliberately I'm sure) provocative title Archaeology is just an expensive way of finding out what historians already know... Of course I immediately felt the need to...actually I didn't. The post does have a point. Archaeology is indeed usually more expensive than historical research. I don't think the central criticism of the article is specific to archaeology. What is actually being complained about here is poorly designed research, without a clear objective. Though it is not clear whether this is because the actual excavation being discussed (a battle field) does not have clear objectives, or that the main source linked to is a Telegraph article. Saying that archaeology just shows what historians already know is a narrow view of the aims of both history and archaeology. Whilst the contribution of archaeology to (in this case) a 200 year old battle that is extensively documented, may be more limited, there are alway...

Micrograph of the Month: Medieval floors

Image
This is the second floor themed micrograph post, you can see examples of Neolithic floors in a post from last year here . You'll notice the same horizontal surface and distinct boundaries, and even a similar type of charred plant, ash and bone debris, however the construction of the floors themselves is quite different. Whereas the prehistoric floors are made from packed mud/earth, these Medieval floors from the town of Riga are made from a calcareous material with a very high quantity of sand grains. It looks very similar to a lime mortar, though I want to do a bit more work on it before saying that for definite. Another difference here, whereas the Neolithic floors were showing signs of post-depositional processes in the form of gypsum crystals, the debris on this floor is remarkably well-preserved. I have put together two photos here, the bottom image showing an earlier floor, overlain by mixed debris, containing tiny bone fragments, wood charcoal and ash. The upper photo show...

Micrograph of the Month - Glauconite Grains

Image
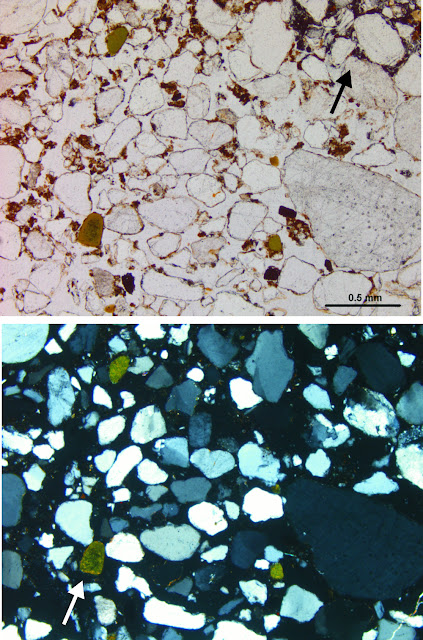
I've been working on and off on these samples from BiaÅ‚a Góra (Poland) as part of the Ecology of Crusading project . We collected them back in June 2011 along with a coring transect survey to assess the nature and extent of the 'cultural layer' at the site. It's a very shallow deposit containing lots of broken ceramics and animal bones etc. The sediment itself looks similar to 'dark earth' deposits in the field, of which there have been many micromorphology studies, largely led in the UK by Dr Richard MacPhail .  The micrograph shows the lowermost 'natural' deposits (upper in PPL and lower in XPL), which consist of a silty sand deposit which becomes coarser further down the profile. The pretty greenish grains are glauconite, an iron potassium silicate mineral, which is thought to be indicative of a marine depositional environment. They can be seen especially clearly in XPL in the lower image.  The geology is this part of Poland (as I found out a...

Crusader Castles of the Baltic

Image
I wrote a feature article for Current World Archaeology Magazine on the Ecology of Crusading project, which has just been published in issue 57. It's a brief overview for a general audience, so there's lots of basic info on the environmental and lab methods we are using as well as some of the preliminary results. And of course lots of fab photos of castles, fieldwork and whatnot. I like writing more general articles like this - it's something I can show the parents and they get all excited about. Pages of technical jargon in J. Arch. Sci. and the like never get quite the same reaction. http://www.world-archaeology.com/features/crusader-castles/ It's exactly 10 issues since the last piece I wrote for them in issue 47, 2011, on Catalhoyuk under the Microscope, which you can read an excerpt from here: http://www.world-archaeology.com/features/turkey-neolithic-life-at-catalhoyuk/

Fun with phytoliths, part 2

Image
Deflocculating the clay particles. Don't forget to label the beakers. After carbonate removal and washing away any remaining acid , stage 2 is to get rid of any clays. Again it depends on the type of sample how long this step will take - whilst ashy samples will have more carbonates, they are likely to have minimal clay content. Conversely, these deposits from ElblÄ…g have much more organic and clay components. Again, this is a very straightforward process, but very time consuming. In fact, for samples with a significant clay component, it can take all day! The samples are transferred from their tubes into tall-form 400mL glass beakers. The height and volume of the beaker is important, as we are using a bit of fluid mechanics to seperate out all the clay and non-clay sized particles. Rinsing beakers into crucibles Distilled water is added  along with a few mL of sodium hexametaphosphate (otherwise known as Calgon), up to a height of 8cm (it's easiest to mark this out o...

Fun with phytoliths, part 1

Image
Weighing out: the container is zeroed and the exact weight of the sample recorded New year, new samples! Well, newish, they were collected in the summer of 2012 but only made their way to me a few weeks ago . Today is my first day on site at the University of Edinburgh, where I am hoping to set up laboratory facilities for microfossil processing. In the meantime I managed to speedily process this last batch at York. Following drying the samples out in the oven, the next few stages involve removal of different fractions of the soil/sediment. Soil is made up of a range of organic and inorganic components - so to get at the phytoliths, we have to remove any non-phytolith material. It is actually quite an easy lab method, but rather time consuming as there is lots of drying and transferring into different sized containers! As with all sample preparation, the samples are weighed after drying so we can quantify how much material has been processed. The amount of sample that we choose to...

Christmas Parcels

Image
What excitement is this? Parcels in the post over Xmas! Perhaps more exciting than all the Xmas chocolates and treats? It's the long awaited box of micromorphology slides from Medieval Riga, Latvia! Ok, so maybe not quite as exciting as chocolate, but still pretty fab. I've been waiting for these to be ready since September so it's quite a nice suprise to see them all finished and coverslipped, just in time to get back to work after the holidays. Excuse the camera flash, I will scan them in properly at some point. Waterlogged and charred plant remains, and also (I suspect) animal dung Occupation debris accumulated on a medieval floor from the city of Riga I also got sent a copy of The Archaeology of the Prussian Crusade by Aleks Pluskowski , PI on the Ecology of Crusading project. Parcels of excitement This is something else I have been looking forward to - I did a lot of the line drawings for it and it has been very exciting seeing it come together ...

Patience when phytolith processing

Image
Not what you want to see when going to check on samples in the drying oven This week I've mostly been packing up boxes and boxes of samples and books ready to be shipped to Edinburgh in January, as well as getting on with the final bits of data tidying for the Feeding Stonehenge project, getting it ready for publication in spring. I can't wait to share the details! I was also sent a set of samples for urgent phytolith processing for the Ecology of Crusading project, to include in a preliminary environmental report for the ElblÄ…g project. Phytolith extraction is probably one of the most straightforward lab processes that I do, though it can be time consuming as it involves lots of stages where the samples need to be dried out. Let this be a lesson; ramping up the temperature of the drying oven may help dry your samples out quicker but it may also have unforseen consequences. In this case I have ruined 3 of my lovely petri dishes. Though bizarrely they haven't actual...

A curious incident

Image
Corroding sample! Yesterday's ICP samples are coming along nicely. I'm happy to say nothing had exploded when I went to check on them this afternoon. Today I also started boxing up the last few samples from medieval Riga, and came across this oddity ---->. All of the samples from Riga were waterlogged, and something strange has happened to this one; you can see all that orange spreading across the bottom of the sample? It is some sort of iron staining, and is very clearly seeping from the sides of the tin into the fine grained clay floor part of the sample. There were also lots of little salt crystals all over the surface, and you can see to the centre right a small area at the top of the metal tin has corroded! I'm wondering if there is a metal object in the block somewhere that is degrading? A few of the other samples had unfortunately started growing mould. In future I will learn to wear a mask when unwrapping waterlogged samples! Hopefully this was just on th...

Elementary, said he

Image
80s-tastic plasma lamp (Wikipedia) Today I was mostly preparing lake sediment core samples for ICP. ICP stands for Inductively Coupled Plasma, and comes either in the MS (mass spectrometry) or OES (optical emission spectrometry) variety. Both are methods for measuring the different elements present in a sample. The ICP bit is a 'torch' containing a gas, typically argon, that is ionised by heating it via electromagnetic induction (remember those weird glowing globe plasma lamps?). Still confused? This means there is a coil wrapped around the torch, which produces a very strong electromagnetic field when turned on. The argon gas is ''lit' by an electrostatic spark, and the gas becomes ionised. The sample (dissolved in liquid) is sprayed into the argon flame, and also becomes ionised. As different components in the sample become ionised they gave off a characteristic energy. The MS and OES parts is the bit that detects the elements present. MS does this by measur...